- Bütçe
- 2000
Merhaba arkadaşlar. Geçenlerde indirim ile FSP MP7 soğutucu aldım ve bu soğutucunun elimden geldiğince detaylı incelemesini yapacağım. FSP markası, bildiğiniz gibi genel olarak PSU üreticileri arasında BABA olarak bilinir. Tabii ki soğutucuda da bu geçerli mi göreceğiz çünkü bu ürün hakkında pek bir inceleme bulamadım ama kesinlikle kaliteli olduğunu söyleyebilirim kısaca. Ürünü İtopya’dan satın aldım. İndirim vardı İtopya’da, sepette 1.798,97 TL'ye aldım. Tabii ParolPara ve İyzico indirimlerinden de faydalandım; yaklaşık 600-700 TL’ye mal oldu bana. Şu an İtopya’da düz fiyatı 2.136,20 TL (Tarih: 05.06.2025).
(Hello friends. Recently, I bought the FSP MP7 cooler during a discount and I’ll try to give as detailed a review as possible. As you may know, FSP is generally considered one of the top brands when it comes to PSU manufacturing. But whether that reputation holds true for coolers too, we’ll see—though I can already say it seems to be a high-quality product. I bought it from İtopya. It was on sale there; I got it for 1,798.97 TL in-cart. With extra discounts from ParolPara and İyzico, it cost me around 600–700 TL in total. As of now, the listed price at İtopya is 2,136.20 TL (Date: 05.06.2025).()
Genel olarak bu soğutucuyu tercih etme sebebim mecburiyet. Çünkü bilen bilir, ParolPara'nın 500 TL GamingGen indirimi askıya alındı. "Site üye iş yeri kategori kodu hatalı" diye bir hata veriyordu. Yoksa Thermalright 7 borulu olanı alacaktım. O yüzden ben de İtopya’ya yöneldim.
(The main reason I went with this cooler was out of necessity. As some of you know, the 500 TL GamingGen discount from ParolPara was suspended. It was giving an error like 'invalid merchant category code.' Otherwise, I would’ve bought the 7-heatpipe model from Thermalright. So I turned to İtopya instead.)
Şimdi ise genel bir değerlendirme yapacağım, detaylı bilgileri sonra yazacağım. İşlemcim Ryzen 5 5600, fanları biraz tozlu sayılırdı. Kışın yine çalışıyordu, 70-75 dereceydi ama bu yaz PC kapanmaya başladı artık sıcaklıktan. Sonra merak edip Afterburner yükleyerek sıcaklık değerlerine baktım ve 85-90 dereceler civarında oynadığını gördüm. Hazır indirim de varken bu soğutucuyu aldım.
(Now for a general assessment—detailed info will follow. My CPU is a Ryzen 5 5600, and the fans were a bit dusty. It was still running during the winter at 70–75°C, but this summer the PC started shutting down due to overheating. Then I installed Afterburner to check the temps and saw it was hovering around 85–90°C. Since there was a sale, I decided to buy this cooler.)
Şu an:
Gerçekten hayvaaanniii bir düşüş var, gözle görülür şekilde.
Sese gelecek olursak, 32 dB’lik bir sesi var maksimum olarak. Sadece OC yaptığım zaman fanları çok net şekilde duyuyorum. Onun haricinde hafif bir ses var sadece. PC çalışma sesi yani. Sadece öyle anlayın, full sessiz değil yani.
Uyumluluk olarak ise neredeyse her cpu destekliyor sanırım.
Intel LGA : 1851 / 1700 / 1200
AMD : AM4 / AM5
Şimdi ise montaja gelelim. Kutu bana İtopya’dan Corsair kutusu içinde geldi, neden bilmiyorum. Bilen varsa yazabilir. Gerekli tüm teknik bilgiler buradaki resimde yazıyor.
(Now the temperatures are: Idle: 33–35°C, In games: 53–56°C
That's a beast of a drop, visibly noticeable. As for noise, it maxes out at 32 dB. I can clearly hear the fans only during overclocking. Other than that, there’s just a faint noise—just the usual PC hum. So not completely silent, but still quiet. In terms of compatibility, it seems to support nearly every CPU:
Intel LGA: 1851 / 1700 / 1200, AMD: AM4 / AM5
Now let’s talk installation. The box was shipped from İtopya inside a Corsair-labeled package, no idea why. If anyone knows, feel free to comment. All the technical details are shown in the picture here.")


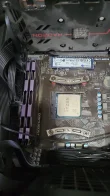
Kutu ve kutu içeriğinden çıkanlar bunlar arkadaşlar. AMD kullanıcıları zaten kırmızı vidaların olduğu poşeti kullanacak ve iki tane bükey demir var, onları kullanacaksınız. Nasıl yerleştirildiğini buraya resim atıyorum.
Unutmayın, işlemcinizi söktükten sonra anakartın arkasında bir plaka var. Önce alttan o plakayı deliklerden yukarı çıkmasını sağlayacak şekilde yerleştirin (vidaların gireceği yer için). Sonra soğutucuyu monte edin.
CPU plakası da genelde aşağıdaki o mavi plaka gibidir ve anakartın arkasındadır. Soğutucuyu monte ederken önce bu plakayı alttan destek verip uçları dışa bakacak şekilde yerleştirin, sonra kırmızı contaları takıp vidaları sıkacaksınız.
O bükey demirler, CPU'nun içine doğru bükey olacak. Unutmayın.
(These are the box and the contents inside, friends. AMD users will use the bag with the red screws and there are two bent metal brackets that you will use. I’m attaching a picture here showing how to place them. Remember, after you remove your CPU, there is a plate on the back of the motherboard. First, insert that plate from underneath so it comes up through the holes (for the screws to go in). Then mount the cooler. The CPU backplate is usually like the blue plate below and is located on the back of the motherboard. When mounting the cooler, first support this plate from underneath, making sure its ends face outward. Then put on the red rubber pads and tighten the screws. Those bent metal brackets should curve inward toward the CPU. Don’t forget that.)


Orijinal CPU’nuzu sökerken mutlaka ama mutlaka bir anda çekmeyin, SAKIN! Yavaşça döndürün, böyle dairesel hareketlerle. Nazik olun, sonra hafif güç uygulayın. Nazikçe çıkacaktır.
CPU’yu temizleyin ama CPU’nuzu yerinden sökmeyin, pinlere zarar verebilirsiniz. En iyisi, CPU’yu sökmeden temizlemektir — benim gibi acemiyseniz.
Neyse, CPU temizlendi ve yeni vidalar takıldı. Şimdi termal macun zamanı. Neyse ki içinden termal macun çıkıyor ama inanılmazzzzz katı bir macundu. Sakız gibiydi. Sürerken çok zor anlar yaşadım.
Macunumuz da bu, sizde varsa bu macunu kullanmayın ya da önceden Arctic MX-4 tarzı bir macun alın. Kutudan çıkan macun bu. Macun sürmeme laf etmeyin, gerçekten çok zorlandım sürerken. İlk seferim değil, daha önce de macun sürdüm.
(When removing your original CPU, absolutely do NOT pull it out all at once, NEVER! Rotate it slowly, using circular motions. Be gentle, then apply light pressure. It will come out gently.
Clean the CPU, but do NOT remove it from its place; you might damage the pins. The best way is to clean the CPU without removing it — especially if you’re a beginner like me.)


Neyse, macunu sürdükten sonra sıra artık soğutucuyu takmaya geldi. Tabii ki en önemli işlem şu: Üzerindeki “WARNING” yazısını kaldırmak. Bazen insanlar bunu unutabiliyormuş, dikkat edin.
Sonra da, o iki fanın bir kablosunu diğerine bağlayın. Zaten bakınca anlayacaksınız hangisi hangisine bağlanıyor diye.
(Anyway, after applying the thermal paste, it was time to install the cooler. Of course, the most important step here is: remove the sticker that says 'WARNING' on it. Some people apparently forget this, so be careful. Then, connect one of the fan cables to the other. You'll easily figure out which one connects to which just by looking at them.)


Bu işlemin ardından, soğutucuyu RAM’i sıkıştırmayacak şekilde yerleştiriyoruz. Fark ettiğiniz üzere, soğutucunun boruları belli bir yöne doğru kavisli. Ben, kavisli yani geniş olan tarafı RAM’e gelecek şekilde taktım ki RAM’i sıkıştırmasın diye.
Neyse, soğutucuyu takarken zaten soğutucunun iki tane vida yeri var ve onlar da bizim koyduğumuz bükey plakalarla denk geliyor. Her plakanın bir vida girişi var.
Soğutucuyu oturttuktan sonra, vida girişi için soğutucuda hazır yerler var. Zaten kutudan çıkan tornavidanızı o deliklerden geçirince, vidalarla tam denk geliyor.
Ardından, işaretlediğim CPU FAN soketine takın. Önceki soğutucunun soketini nereden çıkardıysanız, yeni fan kablosunu da oraya takın.
(After that step, we install the cooler in a way that it doesn’t press against the RAM. As you may notice, the cooler’s heat pipes are curved in one direction. I installed it with the wider, curved side facing the RAM so it wouldn't press on it.
Anyway, when installing the cooler, there are two screw mounts on it that align with the convex brackets we previously installed. Each bracket has one screw hole.
Once you position the cooler, there are pre-cut holes on it for the screws. Just insert the screwdriver that came in the box through those holes, and it lines up perfectly with the screws.
Finally, connect the fan cable to the CPU FAN header I marked. Just plug it into the same header where your previous cooler's fan was connected.)


İyice sıkıştırın ama tüm gücünüzle asla sıkmayın. Sadece bilek kuvvetinizle sıkın, zorlandığı yerde de bırakın.
Bu soğutucuda ARGB var ama ben kullanmak istemediğim için bağlamadım.
Final görüntü böyle.
(Tighten it well, but never use full force. Just use wrist strength, and stop if it starts to resist.
This cooler has ARGB, but I chose not to connect it because I don’t want to use it. Here’s the final look.)

Şimdi ise gelelim sıcaklık görüntülerine ve OC performansına.
OCCT performansı beklediğim gibi olmadı, sanki tam yük bindirmedi gibi hissettim. Bu yüzden Prime95 ile denemeyi tercih ettim.
Prime95 testinde maksimum sıcaklık olarak 71°C gördüm.
Yaklaşık 5 dakikanın sonunda sıcaklık 70 dereceyi geçmedi.
Şimdi ise tekrar deniyorum, yazıya kısa bir mola veriyorum...
10 dakikalık Prime95 test sonuçları aşağıda
(Now, let’s take a look at the temperature results and overclocking performance.
The OCCT performance wasn’t quite what I expected — it felt like it wasn’t fully stressing the CPU.
So, I decided to test with Prime95 instead.
During the Prime95 test, the maximum temperature I saw was 71°C.
After about 5 minutes, it never exceeded 70°C.
I’m running the test again now, taking a short break from writing...
Here are the results of a 10-minute Prime95 test)


(Hello friends. Recently, I bought the FSP MP7 cooler during a discount and I’ll try to give as detailed a review as possible. As you may know, FSP is generally considered one of the top brands when it comes to PSU manufacturing. But whether that reputation holds true for coolers too, we’ll see—though I can already say it seems to be a high-quality product. I bought it from İtopya. It was on sale there; I got it for 1,798.97 TL in-cart. With extra discounts from ParolPara and İyzico, it cost me around 600–700 TL in total. As of now, the listed price at İtopya is 2,136.20 TL (Date: 05.06.2025).()
Genel olarak bu soğutucuyu tercih etme sebebim mecburiyet. Çünkü bilen bilir, ParolPara'nın 500 TL GamingGen indirimi askıya alındı. "Site üye iş yeri kategori kodu hatalı" diye bir hata veriyordu. Yoksa Thermalright 7 borulu olanı alacaktım. O yüzden ben de İtopya’ya yöneldim.
(The main reason I went with this cooler was out of necessity. As some of you know, the 500 TL GamingGen discount from ParolPara was suspended. It was giving an error like 'invalid merchant category code.' Otherwise, I would’ve bought the 7-heatpipe model from Thermalright. So I turned to İtopya instead.)
Şimdi ise genel bir değerlendirme yapacağım, detaylı bilgileri sonra yazacağım. İşlemcim Ryzen 5 5600, fanları biraz tozlu sayılırdı. Kışın yine çalışıyordu, 70-75 dereceydi ama bu yaz PC kapanmaya başladı artık sıcaklıktan. Sonra merak edip Afterburner yükleyerek sıcaklık değerlerine baktım ve 85-90 dereceler civarında oynadığını gördüm. Hazır indirim de varken bu soğutucuyu aldım.
(Now for a general assessment—detailed info will follow. My CPU is a Ryzen 5 5600, and the fans were a bit dusty. It was still running during the winter at 70–75°C, but this summer the PC started shutting down due to overheating. Then I installed Afterburner to check the temps and saw it was hovering around 85–90°C. Since there was a sale, I decided to buy this cooler.)
Şu an:
- Boşta: 33-35 derece
- Oyunlarda: 53-56 derece
Gerçekten hayvaaanniii bir düşüş var, gözle görülür şekilde.
Sese gelecek olursak, 32 dB’lik bir sesi var maksimum olarak. Sadece OC yaptığım zaman fanları çok net şekilde duyuyorum. Onun haricinde hafif bir ses var sadece. PC çalışma sesi yani. Sadece öyle anlayın, full sessiz değil yani.
Uyumluluk olarak ise neredeyse her cpu destekliyor sanırım.
Intel LGA : 1851 / 1700 / 1200
AMD : AM4 / AM5
Şimdi ise montaja gelelim. Kutu bana İtopya’dan Corsair kutusu içinde geldi, neden bilmiyorum. Bilen varsa yazabilir. Gerekli tüm teknik bilgiler buradaki resimde yazıyor.
(Now the temperatures are: Idle: 33–35°C, In games: 53–56°C
That's a beast of a drop, visibly noticeable. As for noise, it maxes out at 32 dB. I can clearly hear the fans only during overclocking. Other than that, there’s just a faint noise—just the usual PC hum. So not completely silent, but still quiet. In terms of compatibility, it seems to support nearly every CPU:
Intel LGA: 1851 / 1700 / 1200, AMD: AM4 / AM5
Now let’s talk installation. The box was shipped from İtopya inside a Corsair-labeled package, no idea why. If anyone knows, feel free to comment. All the technical details are shown in the picture here.")
Kutu ve kutu içeriğinden çıkanlar bunlar arkadaşlar. AMD kullanıcıları zaten kırmızı vidaların olduğu poşeti kullanacak ve iki tane bükey demir var, onları kullanacaksınız. Nasıl yerleştirildiğini buraya resim atıyorum.
Unutmayın, işlemcinizi söktükten sonra anakartın arkasında bir plaka var. Önce alttan o plakayı deliklerden yukarı çıkmasını sağlayacak şekilde yerleştirin (vidaların gireceği yer için). Sonra soğutucuyu monte edin.
CPU plakası da genelde aşağıdaki o mavi plaka gibidir ve anakartın arkasındadır. Soğutucuyu monte ederken önce bu plakayı alttan destek verip uçları dışa bakacak şekilde yerleştirin, sonra kırmızı contaları takıp vidaları sıkacaksınız.
O bükey demirler, CPU'nun içine doğru bükey olacak. Unutmayın.
(These are the box and the contents inside, friends. AMD users will use the bag with the red screws and there are two bent metal brackets that you will use. I’m attaching a picture here showing how to place them. Remember, after you remove your CPU, there is a plate on the back of the motherboard. First, insert that plate from underneath so it comes up through the holes (for the screws to go in). Then mount the cooler. The CPU backplate is usually like the blue plate below and is located on the back of the motherboard. When mounting the cooler, first support this plate from underneath, making sure its ends face outward. Then put on the red rubber pads and tighten the screws. Those bent metal brackets should curve inward toward the CPU. Don’t forget that.)
Orijinal CPU’nuzu sökerken mutlaka ama mutlaka bir anda çekmeyin, SAKIN! Yavaşça döndürün, böyle dairesel hareketlerle. Nazik olun, sonra hafif güç uygulayın. Nazikçe çıkacaktır.
CPU’yu temizleyin ama CPU’nuzu yerinden sökmeyin, pinlere zarar verebilirsiniz. En iyisi, CPU’yu sökmeden temizlemektir — benim gibi acemiyseniz.
Neyse, CPU temizlendi ve yeni vidalar takıldı. Şimdi termal macun zamanı. Neyse ki içinden termal macun çıkıyor ama inanılmazzzzz katı bir macundu. Sakız gibiydi. Sürerken çok zor anlar yaşadım.
Macunumuz da bu, sizde varsa bu macunu kullanmayın ya da önceden Arctic MX-4 tarzı bir macun alın. Kutudan çıkan macun bu. Macun sürmeme laf etmeyin, gerçekten çok zorlandım sürerken. İlk seferim değil, daha önce de macun sürdüm.
(When removing your original CPU, absolutely do NOT pull it out all at once, NEVER! Rotate it slowly, using circular motions. Be gentle, then apply light pressure. It will come out gently.
Clean the CPU, but do NOT remove it from its place; you might damage the pins. The best way is to clean the CPU without removing it — especially if you’re a beginner like me.)
Neyse, macunu sürdükten sonra sıra artık soğutucuyu takmaya geldi. Tabii ki en önemli işlem şu: Üzerindeki “WARNING” yazısını kaldırmak. Bazen insanlar bunu unutabiliyormuş, dikkat edin.
Sonra da, o iki fanın bir kablosunu diğerine bağlayın. Zaten bakınca anlayacaksınız hangisi hangisine bağlanıyor diye.
(Anyway, after applying the thermal paste, it was time to install the cooler. Of course, the most important step here is: remove the sticker that says 'WARNING' on it. Some people apparently forget this, so be careful. Then, connect one of the fan cables to the other. You'll easily figure out which one connects to which just by looking at them.)
Bu işlemin ardından, soğutucuyu RAM’i sıkıştırmayacak şekilde yerleştiriyoruz. Fark ettiğiniz üzere, soğutucunun boruları belli bir yöne doğru kavisli. Ben, kavisli yani geniş olan tarafı RAM’e gelecek şekilde taktım ki RAM’i sıkıştırmasın diye.
Neyse, soğutucuyu takarken zaten soğutucunun iki tane vida yeri var ve onlar da bizim koyduğumuz bükey plakalarla denk geliyor. Her plakanın bir vida girişi var.
Soğutucuyu oturttuktan sonra, vida girişi için soğutucuda hazır yerler var. Zaten kutudan çıkan tornavidanızı o deliklerden geçirince, vidalarla tam denk geliyor.
Ardından, işaretlediğim CPU FAN soketine takın. Önceki soğutucunun soketini nereden çıkardıysanız, yeni fan kablosunu da oraya takın.
(After that step, we install the cooler in a way that it doesn’t press against the RAM. As you may notice, the cooler’s heat pipes are curved in one direction. I installed it with the wider, curved side facing the RAM so it wouldn't press on it.
Anyway, when installing the cooler, there are two screw mounts on it that align with the convex brackets we previously installed. Each bracket has one screw hole.
Once you position the cooler, there are pre-cut holes on it for the screws. Just insert the screwdriver that came in the box through those holes, and it lines up perfectly with the screws.
Finally, connect the fan cable to the CPU FAN header I marked. Just plug it into the same header where your previous cooler's fan was connected.)
İyice sıkıştırın ama tüm gücünüzle asla sıkmayın. Sadece bilek kuvvetinizle sıkın, zorlandığı yerde de bırakın.
Bu soğutucuda ARGB var ama ben kullanmak istemediğim için bağlamadım.
Final görüntü böyle.
(Tighten it well, but never use full force. Just use wrist strength, and stop if it starts to resist.
This cooler has ARGB, but I chose not to connect it because I don’t want to use it. Here’s the final look.)
Şimdi ise gelelim sıcaklık görüntülerine ve OC performansına.
OCCT performansı beklediğim gibi olmadı, sanki tam yük bindirmedi gibi hissettim. Bu yüzden Prime95 ile denemeyi tercih ettim.
Prime95 testinde maksimum sıcaklık olarak 71°C gördüm.
Yaklaşık 5 dakikanın sonunda sıcaklık 70 dereceyi geçmedi.
Şimdi ise tekrar deniyorum, yazıya kısa bir mola veriyorum...
10 dakikalık Prime95 test sonuçları aşağıda
(Now, let’s take a look at the temperature results and overclocking performance.
The OCCT performance wasn’t quite what I expected — it felt like it wasn’t fully stressing the CPU.
So, I decided to test with Prime95 instead.
During the Prime95 test, the maximum temperature I saw was 71°C.
After about 5 minutes, it never exceeded 70°C.
I’m running the test again now, taking a short break from writing...
Here are the results of a 10-minute Prime95 test
)